How to Wire a Consumer Unit? To wire a consumer unit in the UK, first verify compliance with the BS 7671 regulations, focusing on safety and proper power distribution. Begin by isolating the power supply and verifying the absence of voltage using a tester. Install the unit securely on a fire-resistant backing at a recommended height of 0.45 to 1.2 meters, guaranteeing good ventilation. Wire the live, neutral, and earth cables to the unit’s respective bus bars and terminals, adhering to colour codes and securing connections to recommended torques. Properly label all circuits for easy identification. Understanding each step’s purpose will enhance the installation’s safety and effectiveness.
Key Takeaways
- Disconnect the power and confirm no voltage with a tester before wiring the consumer unit.
- Install the consumer unit between 0.45 and 1.2 meters off the ground, ensuring proper ventilation.
- Connect the live, neutral, and earth wires to their respective terminals using a torque screwdriver to ensure secure connections.
- Use colour-coded wires to maintain standard wiring practices (Live: Brown, Neutral: Blue, Earth: Green/Yellow).
- Label all circuit breakers clearly and accurately for easy identification and maintenance.
Table of Contents
Understanding the Consumer Unit
A consumer unit, often called a fuse box, is a critical component in household electrical systems. It serves as the central hub where power is distributed and managed.
It comprises various essential elements such as circuit breakers, RCDS (Residual Current Devices), and bus bars, each playing a pivotal role in ensuring electrical safety and functionality.
Understanding these components and their correct configuration is fundamental for the unit’s safe installation and reliable operation.
What Is a Consumer Unit?
In many UK homes, the consumer unit is the essential hub for managing and distributing electricity safely throughout the property. Often referred to as a fuse box, this critical component guarantees that electrical distribution is handled efficiently and safely, adhering to rigorous installation standards.
Consumer units come in various types, each designed to meet specific requirements and applications. The selection ranges from standard domestic units that cater to everyday household needs to more robust versions designed for commercial environments.
Each type is built to comply with the UK’s stringent electrical safety regulations, which are encapsulated in the Wiring Regulations (BS 7671). These regulations dictate not only the setup and configuration of the consumer units but also emphasise the importance of protective measures such as circuit breakers and RCDS (Residual Current Devices).
Proper installation and maintenance of a consumer unit are paramount. They must be executed by a qualified electrician who can ascertain that all components meet the legal safety standards and are suitable for the property’s specific demands.
This adherence to safety prevents electrical hazards and enhances the overall efficiency of the electrical system within the home.
Key Components Explained
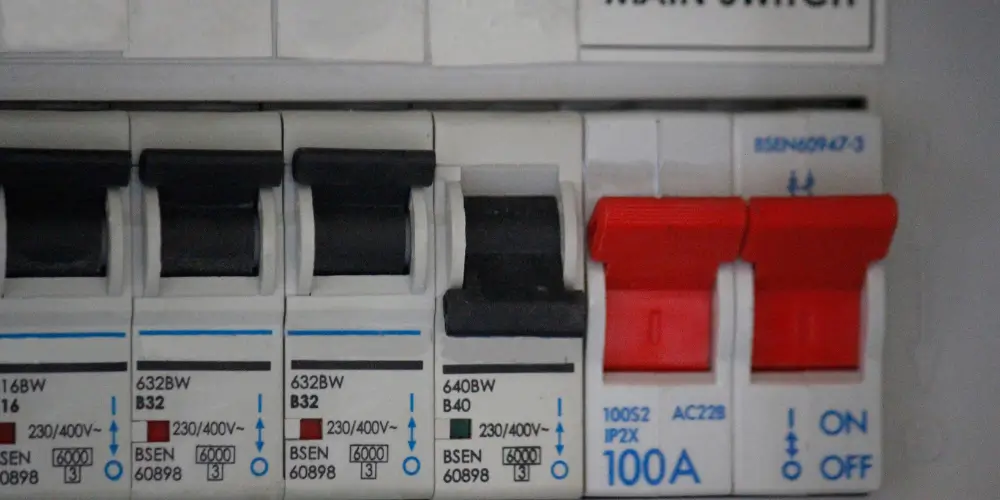
Several key components are essential for the consumer unit’s operation and safety. The first important element is the main switch, which allows for the complete disconnection of the electrical supply, enabling safe maintenance and emergency control. Distinct consumer unit types accommodate varying property sizes and electrical demands, ranging from single-phase units for residential use to three-phase units for commercial buildings.
Circuit breakers are integral for protection. They are designed to automatically cut off electrical power when they detect a fault or overload, preventing fire hazards or equipment damage. Each circuit breaker within the unit is tailored to specific circuit requirements, ensuring precise electrical load balancing and enhancing system efficiency. This balancing is essential in preventing circuit overload and maintaining steady voltage across all connected devices.
Additionally, residual current devices (RCDS) are implemented to provide critical protection against electric shock. These devices rapidly break a circuit when they sense a leakage current to earth, greatly increasing the system’s safety.
Understanding the functions and interrelations of these components in consumer units is imperative for ensuring the efficiency and safety of electrical installations.

Safety Precautions Before Wiring
Before initiating any wiring tasks on a consumer unit, it is essential to guarantee that the power supply is completely isolated to prevent electrical shock or accidents.
This requires confirming the disconnection of all relevant circuits and verifying with a voltage tester.
Additionally, to safeguard against potential hazards, adherence to personal protective equipment (PPE) protocols, including insulated gloves and eye protection, is mandatory.
Importance of Isolating Power Supply
Assuring the power supply is completely isolated is the critical first step in safely wiring a consumer unit in the UK. This precautionary measure is essential to prevent accidental electrical shocks or unintended circuit energisation during installation or maintenance activities.
Isolation of the power supply assures a safe working environment by eliminating the risk of current flow, providing a clear and secure boundary for technicians to work within.
The main electricity supply must be switched off at the meter point or the main disconnect to achieve complete isolation. Power isolation should be verified using an appropriate voltage tester or multimeter to ensure no live voltage in the consumer unit or associated circuitry.
This verification step is a formality and a critical component of electrical safety protocols to safeguard against potential hazards.
Furthermore, locking off the main switch with a suitable lockout device prevents unauthorised or unaware individuals from re-energising the system.
This protective measure enhances overall circuit protection by maintaining a controlled and secure state throughout the wiring process, aligning with the highest electrical safety standards.
Personal Protective Equipment (PPE) Requirements
Wearing appropriate Personal Protective Equipment (PPE) is essential when preparing to wire a consumer unit in the UK. PPE compliance adheres to legal safety standards and greatly mitigates the risk of accidents during electrical installations. Understanding the various PPE types is vital for electricians to guarantee full protection.
Insulating gloves are necessary; they prevent electrical shocks and burns by providing a non-conductive barrier between the electrician and energised components.
In addition, safety goggles or face shields are required to protect against flying sparks or debris that could cause eye injuries.
Furthermore, flame-resistant clothing shields the body from burns and should be worn over regular work attire.
Sturdy, insulated footwear is also necessary to protect against electrical shocks through the ground.
Each piece of PPE must meet specific safety standards set by the UK’s Health and Safety Executive (HSE). Electricians should verify that all PPE is well-maintained, regularly inspected, and replaced if any sign of degradation or damage is detected.
Adherence to these PPE requirements concerns personal safety and fostering a culture of safety and responsibility within the electrical profession.
Turn Off the Main Power Supply
Verifying that the main power supply is completely disconnected is imperative before commencing any wiring activities on a consumer unit.
Isolating the power prevents the risk of electrical shock or other serious injuries, establishing a safe work environment.
Utilise a lockout-tagout (LOTO) system to shut off securely and indicate that the electrical circuit is under maintenance.
Why Power Isolation Is Essential
Turning off the main power supply before beginning wiring activities in a consumer unit is critical for safety.
Isolation of power prevents accidental energisation, safeguards against electric shocks, and guarantees a secure environment for electrical work. It is a fundamental practice that aligns with stringent electrical safety protocols to mitigate risks associated with direct and indirect contact with live circuits.
Here are the primary reasons why power isolation is essential:
- Prevention of Electrical Accidents: Disconnecting the power supply eliminates the risk of electrocution, providing a safe workspace for electricians and technicians.
- Protection Against Power Outages: Isolation helps maintain stability in the electrical system, reducing the likelihood of unexpected power outages during maintenance or installation, which can lead to data loss or hardware damage in connected systems.
- Avoidance of Circuit Overloads: By isolating the power, electricians can prevent circuit overloads during installation, which might otherwise occur due to accidental short circuits or incorrect connections.
- Compliance with Health and Safety Regulations: Adhering to legal and safety standards, power isolation guarantees that all electrical work is performed under controlled and secure conditions, thereby avoiding potential legal issues.
Safe Methods to Isolate Electricity
To guarantee a safe working environment when wiring a consumer unit, the electricity must be correctly isolated by turning off the main power supply. Implementing rigorous isolation techniques is essential to prevent accidental electrocution or circuit damage. This process involves safety switches and circuit breakers designed to completely disconnect the power supply to the consumer unit.
Here are essential steps and considerations for safe isolation:
| Step | Description | Key Equipment |
| Identify the Main Switch | Locate the main switch on the panel. | Safety signage |
| Verify Isolation | Confirm all circuits are de-energised. | Voltage tester |
| Lockout/Tagout | Secure the switch in the off position. | Lockout device, Tags |
| Final Inspection | Double-check all disconnections. | Inspection checklist |
A lockout/tagout system guarantees that the isolated state is maintained during the installation or maintenance work, preventing the circuit from inadvertently re-energising. Each step must be performed precisely and adhere to safety protocols to guarantee the technician’s safety and the electrical system’s integrity.
Remove the Old Consumer Unit (If Replacing)
Before removing the existing consumer unit, guarantee that all necessary tools, such as insulated screwdrivers, wire cutters, and voltage testers, are readily available.
Old wiring must be handled carefully, as it may be fragile and pose electrical hazards.
Always verify that the power is completely disconnected before proceeding with the removal to prevent any risk of electric shock.
Tools Required for Removal
Several essential tools are required when preparing to remove an existing consumer unit as part of an upgrade or replacement. These tools are necessary for efficiency and guaranteeing safety during the removal process.
Mastery of these tools and their proper application is vital for professionals who aim to remove old electrical components precisely and safely.
- Insulated Screwdrivers: Various screwdriver types are needed, including flathead and Phillips. Verify that these are VDE certified, which provides additional safety against electrical shock, which is vital when dealing with potentially live circuits.
- Pliers: Use pliers to grip and bend wires. Needle-nose pliers are particularly useful for reaching into tight spaces within the consumer unit. Confirm that the pliers have insulated handles to prevent accidental electrical contact.
- Cable Cutters: These are used to cut old wires cleanly. High-quality cutters guarantee a clean cut without fraying the wires, which can be vital when installing a new unit.
- Multimeter: Before removing the appliance, verify its absence using a multimeter. This step is critical to confirm that all circuits are safe to handle, thereby preventing electrical hazards.
When used with expertise and caution, these tools form the backbone of a safe and effective removal of a consumer unit.
Handling Old Wiring Safely
When removing an old consumer unit to make way for a replacement, handling the existing wiring with utmost care is essential to prevent damage and confirm safety. The old wiring in many buildings can pose significant hazards due to the deterioration of insulation and the potential for outdated materials to fail under stress.
Before initiating the removal, ascertain that the entire system is powered down to avoid electrical shocks.
Safe removal techniques include carefully labelling each circuit to preserve the configuration and facilitate the reconnection in the new unit. Cable cutters and wire strippers that meet current industry standards can also be employed to avoid fraying or cutting too deeply, which could compromise the integrity of the wiring.
Inspect the old wires for signs of wear, tear, or heat damage and consider replacing them if they do not meet upgraded safety standards.
Adherence to safety protocols is vital. Always wear appropriate protective gear, such as insulated gloves and eye protection. Keep a fire extinguisher accessible in case electrical sparks ignite flammable materials.
Choose the Right Location for Installation
An ideal location to install a consumer unit is essential for compliance and operational efficiency.
It should be positioned away from sources of moisture and excessive heat to prevent damage and enhance safety.
Adherence to local building regulations regarding placement can facilitate accessibility for maintenance and guarantee legal compliance.
Ideal Placement and Regulations
Choosing the ideal location for installing a consumer unit is governed by strict regulations to guarantee safety and accessibility. Selecting the correct site involves understanding and adhering to several key factors essential for operational efficiency and safety compliance. Below is detailed guidance on important considerations:
- Ideal Height: The consumer unit should be installed at a height accessible to all users, including those with physical limitations. The recommended installation height is between 0.45 meters and 1.2 meters from the floor, making it within easy reach for both standing and seated users.
- Accessibility Standards: The installation site must be accessible for maintenance and emergency interventions without obstructions. Adequate space around the consumer unit must facilitate safe and unimpeded access.
- Ventilation Considerations: Confirm that the chosen location has good ventilation to avoid overheating. The consumer unit must not be enclosed in a tightly sealed cabinet; a minimum clearance is specified to guarantee sufficient air circulation around the unit.
- Compliance with Building Regulations: The installation must comply with UK building regulations, which dictate specific requirements for electrical installations to guarantee safety and functionality. This includes adherence to the Wiring Regulations (BS 7671).
Avoiding Moisture and Heat Exposure
Guaranteeing that your consumer unit is positioned to minimise exposure to moisture and heat is essential for maintaining its efficiency and prolonging its lifespan. The selection of an installation site must prioritise environmental considerations, including ambient temperature and humidity levels.
It is advisable to incorporate appropriate moisture barriers and heat insulation techniques to safeguard the unit.
When choosing the installation location, avoid areas prone to dampness, such as basements without adequate waterproofing or areas near bathrooms and kitchens where steam and condensation are common.
Utilise moisture barriers that conform to current building regulations to prevent potential water ingress, which could lead to electrical failures and hazards.
Similarly, excessive heat can degrade the components of a consumer unit. Avoid installing the unit near heat sources such as radiators, boilers, or direct sunlight.
Heat insulation around the consumer unit can help maintain a stable internal temperature, preventing thermal stress on circuit breakers and other sensitive components.
Considering these protective measures, the right consumer unit installation guarantees operational reliability and safety.
It also complies with the UK wiring regulations, which emphasise protecting electrical systems from environmental factors.
Fit the New Consumer Unit to the Wall
When fitting a new consumer unit to the wall, robust fixing methods are vital to guarantee the unit is securely mounted and stable.
The wall material and structure dictate the type of fixings required, typically heavy-duty screws or bolts, to prevent any movement or vibration.
Additionally, it is important to install a fire-resistant backing board behind the unit to enhance safety by mitigating fire risks associated with electrical faults.
Fixing Methods for Secure Mounting
Properly securing the consumer unit to the wall is a vital step that guarantees the safety and functionality of your electrical system.
Correct installation prevents mechanical stress that might compromise the unit’s structural integrity or disturb its operational efficacy.
Here are the detailed, step-by-step mounting strategies:
- Selection of Mounting Surface**: Confirm that the wall is structurally sound and capable of supporting the weight of the consumer unit, along with any potential dynamic loads caused by wire movement or door operation.
- Installation of Mounting Brackets**: Use robust mounting brackets specifically designed for your consumer unit’s weight and dimensions.
Position them at predetermined points to distribute the load evenly.
- Securing with Wall Anchors**: Use heavy-duty wall anchors appropriate for the wall material—brick, concrete, or drywall**.
This guarantees a firm and secure installation, preventing the unit from dislodging over time due to vibrations or pulling forces.
- Incorporation of Vibration Dampeners**: Place vibration dampeners between the mounting brackets and the wall.
These reduce the transmission of operational vibrations, minimising the risk of loosening over time and enhancing the unit’s longevity.
Each step is vital for confirming a safe and reliable installation.
Ensuring Fire-Resistant Backing
One crucial aspect of installing a new consumer unit is implementing a fire-resistant backing, which enhances safety.
Utilising fire-resistant materials in the backing protects the building structure and enhances the electrical system’s safety. The materials chosen must meet stringent fire safety codes and be rated accordingly to resist high temperatures and prevent the spread of flames.
When selecting a suitable fire-resistant backing, consider intumescent pads or fire-rated boards designed for electrical installations. These are tested under conditions that simulate actual fire scenarios, guaranteeing they meet the necessary safety requirements.
Installation guidelines for fire-resistant backing are precise. To provide maximum protection, the backing should cover the entire area behind the consumer unit and extend several inches beyond the edges.
It must be securely attached to the wall, guaranteeing that no gaps or loose fittings could compromise its effectiveness.
Adherence to these guidelines not only guarantees compliance with current electrical and building safety standards but also provides peace of mind, knowing that the installation promotes a higher level of fire safety in residential or commercial properties.
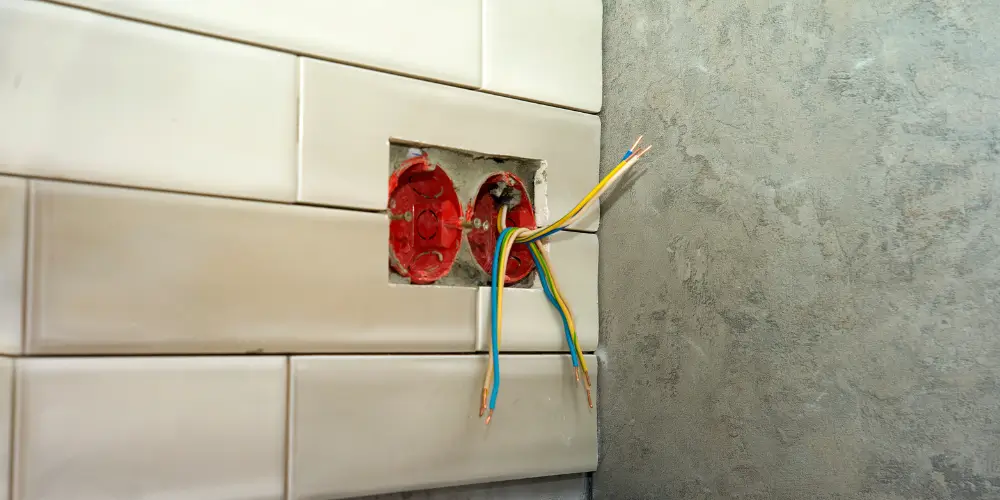
Prepare and Route the Incoming Mains Cable
Accurate stripping and measuring the cable length are essential before connecting the incoming mains cable to the consumer unit, guaranteeing a safe and efficient installation.
It is important to position the cables to minimise mechanical strain and avoid sharp bends, which can compromise the integrity of the insulation and conductors.
Using appropriate tools and techniques for cable preparation will facilitate a reliable connection and maintain the electrical system’s overall safety.
Stripping and Measuring Cable Length
Begin the installation by carefully stripping and accurately measuring the length of the incoming mains cable. Confirming that the cable types are compatible with the consumer unit’s specifications and conform to local electrical standards is crucial. Precision in preparation is essential for safety and the electrical system’s efficiency and reliability.
Select the Appropriate Cable Type
Depending on the environmental conditions and electrical load, determine whether your installation requires T&E (twin and earth), armoured, or another
cable type.
Use Correct Measuring Techniques
Employ a reliable measuring tape or a laser measure to determine the exact length needed, avoiding excess that can lead to cable clutter or shortage that might stretch and damage the cable.
Choose Suitable Stripping Tools
Utilise a cable stripper that matches the size and type of your cable to guarantee a clean cut without damaging the internal wires. Automatic or adjustable strippers offer precision and ease.
Assess Cable Integrity Post-Stripping
After removing the outer sheath, inspect the bare wires for any nicks or damage, as this could impact the safety and functionality of the installation. Verify the stripped ends are smooth and uniform for secure connections.
Following these steps meticulously will guarantee your consumer unit’s safe and efficient setup.
Positioning Cables to Minimise Strain
After preparing and measuring the cable, careful consideration must be given to its routing to minimise mechanical strain and guarantee long-term reliability. Implementing strategic cable management techniques is essential. The cable path should avoid sharp bends and frequent changes in direction, as these are primary stress points that can lead to insulation damage or wire fatigue over time. Utilising broad, sweeping curves assists in maintaining the integrity of the cable’s internal structure.
Employing strain relief methods is also vital. Cable glands or clamps should be installed where the cable enters or exits the consumer unit. These devices secure the cable firmly, distributing the mechanical load and preventing undue stress at the connection points, which could otherwise lead to disconnections or damage under physical duress.
Optimal routing strategies further enhance the setup’s safety and functionality. Ensure that cables are routed away from sources of heat and moisture, which can degrade insulation and conductive cores, potentially leading to electrical faults.
Maintaining a neat, organised wire layout inside the consumer unit facilitates easier maintenance and troubleshooting, reducing the risk of accidental contact with live wires during future adjustments or repairs.
Connect the Main Switch and Neutral Bar
To correctly wire the consumer unit, first verify the correct identification of live, neutral, and earth wires, which is vital for electrical safety and system reliability.
When connecting these wires to the main switch and neutral bar, securing each connection to the recommended torque is imperative, preventing potential loose connections that could lead to electrical failures or hazards.
Always use a torque screwdriver to achieve the precise tightness required, as specified by the wiring regulations and the manufacturer’s guidelines.
Identifying Live, Neutral, and Earth Wires
Correctly identifying the live, neutral, and earth wires is essential before connecting them to the consumer unit’s main switch and neutral bar. Mastery of wire colour coding, understanding wire insulation types, and discerning wire gauge differences are fundamental to ensuring safety and functionality in electrical installations.
- Wire Colour Coding: In the UK, standard colour codes are:
- Live (L): Brown
- Neutral (N): Blue
- Earth (E): Green and yellow striped
- Wire Insulation Types: Insulation is vital for safety and wire integrity. Common types include PVC, which is durable and offers good resistance to electricity, and cross-linked polyethene (XLPE), known for its high temperature and chemical resistance.
- Wire Gauge Differences: The wire gauge indicates the thickness of the wire, which affects its current-carrying capacity. For instance, a 4mm² wire is typically used for circuits with higher amperage requirements than a 1.5mm² wire, which is suited for lighting circuits.
- Visual Inspection and Testing**: Before making any connections, visually inspect the wires for damage. Use a multimeter to verify the identity of each wire, ensuring that the colour codes match the expected electrical properties.
This step is essential for preventing any potential electrical hazards.
Tightening Connections to Safe Torque
Guaranteeing that all connections within the consumer unit are tightened to the appropriate torque is essential for safety and functionality. Adherence to torque specifications prevents loose connections that can lead to electrical fires or equipment failure.
When connecting the main switch and neutral bar, use a torque screwdriver set to the manufacturer’s recommended settings. Torque values are typically expressed in Newton-meters (Nm). Still, they can vary depending on the device and the type of conductor used.
Applying correct connection techniques is critical. Verify that the wires are stripped to the correct length and inserted fully into the terminal before tightening. This avoids any potential contact issues which can arise from improperly seated wires.
For copper conductors, it’s also essential to avoid overtightening, which can deform or break the conductor, compromising the connection’s integrity.
Furthermore, always comply with established safety standards. Protective gloves and eye protection should be worn to prevent injuries from accidental sparks or sharp wire ends.
Regularly check and recalibrate your torque tools to maintain precision in your work. By meticulously managing these aspects, you guarantee the reliability and safety of the electrical installations within the consumer unit.
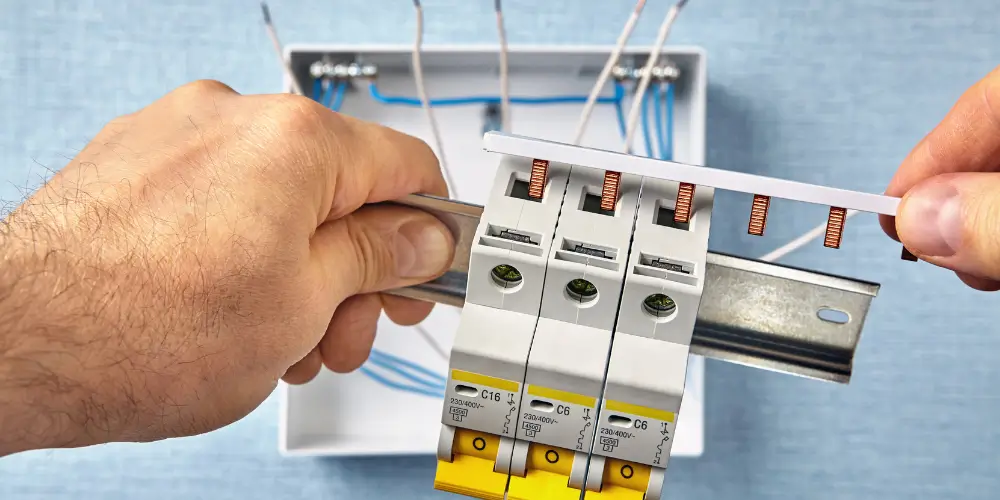
Install and Wire Circuit Breakers or RCBOS
When installing circuit breakers or RCBOS in a consumer unit, selecting the appropriate type for each circuit’s specific demands is essential.
Each breaker must be connected to its corresponding circuit, ensuring that all wiring is secure and conforms to the latest wiring regulations for safety and efficiency.
Proper connection safeguards the electrical system and helps prevent potential electrical hazards.
Selecting the Right Breaker Type
Selecting the appropriate breaker type is vital for guaranteeing the safety and efficiency of your electrical system. Understanding the breaker specifications, including voltage ratings and load capacity, is essential in selecting the right breaker for your consumer unit.
Here’s a step-by-step guide to help you make an informed decision:
- Assess Load Capacity: Calculate the total load of the circuits that the breaker will manage. Confirm the breaker can handle this load with a safe margin to prevent overloading, which can lead to tripping and potential fire hazards.
- Check Voltage Ratings: Confirm that the breaker’s voltage ratings are compatible with your system. In the UK, most residential systems operate at 230v, so a breaker rated for this or higher is necessary.
- Type of Breaker: Decide between MCBS (Miniature Circuit Breakers) for general circuits and RCBOS (Residual Current Breakers with Overcurrent protection) for circuits requiring additional safety against earth faults, especially in wet areas.
- Compliance with Standards: Confirm the breaker adheres to UK and European safety standards such as BS EN 60898 or BS EN 61009 for RCBOS. Compliance guarantees the breaker’s reliability and effectiveness in fault conditions.
Selecting the correct breaker enhances your electrical system’s safety, efficiency, and compliance with regulatory standards.
Connecting Each Circuit Correctly
Proper installation and wiring of circuit breakers or RCBOS are important in setting up a consumer unit. Confirming accurate circuit load management can prevent electrical overloads and enhance safety. Each breaker must correspond to a specific circuit, serving lighting, outlets, or major appliances.
Adhere to wiring colour codes, typically brown for live, blue for neutral, and green-yellow for earth. This standardisation facilitates future maintenance and guarantees compliance with electrical regulations.
Connect the circuit live wire (brown) to the breaker’s output terminal. The neutral wire (blue) should be secured in the neutral link bar, and the earth wire (green-yellow) must be connected to the earth terminal bar. These connections must be tight and secure to prevent any potential electrical hazards.
After wiring, employ circuit testing procedures to verify the integrity of each connection. Use a multimeter to measure continuity, insulation resistance, and correct polarity.
Test each circuit independently to verify that it is operational and safe before energising the consumer unit. Rigorous testing not only confirms the installation’s safety but also its effectiveness in circuit load management.
Label All Circuits Clearly
Labelling all circuits in a consumer unit is essential for safety and maintenance.
Utilising the manufacturer’s provided labelling templates guarantees consistency and accuracy in identifying circuit functions.
Maintaining current labels that reflect updates or changes to the system is imperative to facilitate efficient troubleshooting and guarantee compliance with electrical standards.
Using Manufacturer’s Labelling Templates
Utilising the manufacturer’s labelling templates is essential for guaranteeing clarity and consistency when wiring a consumer unit. These templates are designed to meet specific wiring standards and adhere to manufacturer guidelines, providing a systematic circuit identification approach that enhances safety and functionality.
Here’s how to effectively use these templates:
Select the Correct Template
Verify that the template matches the consumer unit’s make and model. Manufacturer guidelines typically provide a selection of template designs suitable for various configurations.
Follow Wiring Standards
Each label should correspond to the national wiring standards. This includes accurate descriptions of each circuit, which aids in future troubleshooting
and maintenance.
Placement of Labels
Apply labels adjacent to their respective circuit breakers. This placement should be clear, accessible, and visible, following the layout provided in the template
design.
Consistency
Use a uniform font size, colour, and style as the template dictates. Consistency in labelling improves the aesthetics and guarantees that the labels are easily readable during emergencies or inspections.
Keeping Labels Up to Date
Following the application of the manufacturer’s labelling templates, maintaining updated labels on all circuits within a consumer unit is imperative for ensuring ongoing safety and efficiency. This practice is not only a requirement under electrical safety regulations but also facilitates swift and accurate troubleshooting and maintenance, reducing the risk of errors or accidents caused by misidentification.
A systematic approach to circuit identification is essential to adhere to the best practices of the labelling standards. Each circuit should be marked with durable, legible labels that withstand environmental factors typical in electrical installations.
Regular audits of the labelling system should be scheduled as part of the updating procedures to verify that all labels are accurate and visible.
Updating labels involves reviewing and adjusting the details on each label to reflect any changes in the circuit configurations or newly added components. This may include reassigning circuit numbers, revising load descriptions, or updating safety warnings.
Standardised label formats and materials that meet the regulatory requirements for electrical installations are recommended.

Perform Electrical Safety Checks
Conducting thorough electrical safety checks before energising a newly wired consumer unit is imperative to guarantee compliance and safety.
Begin with a visual inspection, using a checklist to assess the correct installation and absence of visible defects in the components.
Additionally, verify the tightness of all terminal connections to prevent potential electrical failures due to loose connections.
Visual Inspection Checklist
Initiating the wiring of a consumer unit in the UK requires a thorough visual inspection to verify safety and compliance with electrical standards.
Understanding the importance of a visual inspection checklist is essential as it helps identify common defects that could compromise the system’s integrity and safety.
Mastery of visual inspection techniques is vital for professionals who want to confirm that installations meet regulatory bodies’ stringent requirements.
Here is a detailed checklist to follow during the visual inspection:
- Condition of Components: Inspect all components for any signs of damage, wear, or corrosion. Confirm that there are no cracked casings or loose parts that could indicate potential failures.
- Correct Ratings and Specifications: Verify that all circuit breakers and devices comply with the system’s requirements and are appropriately rated for the load they will manage.
- Proper Labelling: Check that all circuits are clearly labelled, which aids in future maintenance and verifies correct and safe circuit identification.
- Signs of Overheating: Look for discolouration or burning on wiring and components, indicating past overloads or poor connections.
Each step in this checklist is designed to uncover issues that could lead to severe consequences if left unaddressed, highlighting the critical nature of meticulous visual inspections.
Verifying Terminal Tightness
After completing the visual inspection, the next critical step in confirming electrical safety within a consumer unit is verifying the tightness of all terminal connections. This process, central to preventing common connection issues such as overheating and electrical fires, requires meticulous adherence to terminal inspection methods and torque specifications guidelines.
| Component | Recommended Action |
| Circuit Breakers | Check and adjust to the manufacturer’s torque specs |
| Neutral Bar | Confirm uniform tightness across all connections |
| Earth Bar | Verify secure and even pressure |
| Main Switch | Test for any movement; retighten if necessary |
| Busbar Connections | Inspect for any signs of looseness or corrosion |
Utilising a calibrated torque screwdriver, electricians must confirm that each terminal screw is tightened according to the specifications provided by the equipment manufacturers. This precision helps mitigate risks associated with poor electrical connections, such as arcing or thermal failure, which are pivotal in safeguarding the integrity of the consumer unit’s operation. Regular re-inspection and maintenance are advised to sustain ideal safety standards and functionality, reinforcing the critical nature of precise, safety-focused installations and checks.
Can I get a new consumer unit without a rewire?
Many homeowners wonder if it is possible to install a new consumer unit without undertaking a complete rewire of their property. This query is particularly relevant when considering the implications of consumer unit upgrades, adhering to electrical safety regulations, and managing installation costs.
Understanding the feasibility and requirements can help in making an informed decision. Here’s what needs to be considered:
- Existing Wiring Condition: It is vital to evaluate the condition of the existing wiring. A complete rewire may be necessary before fitting a new consumer unit to guarantee safety and compliance if it does not comply with the latest electrical standards.
- Regulatory Compliance: Under the latest electrical safety regulations, any new consumer unit must be installed by the Wiring Regulations (currently BS 7671). This includes considerations regarding the type of consumer unit, its location, and how it integrates with existing electrical systems.
- Type of Consumer Unit: The choice of consumer unit—whether a split load, main switch, or dual RCD—depends on the property’s specific needs and must align with the capacity and design of existing electrical circuits.
- Inspection and Testing: Before and after installation, rigorous testing and inspection are essential to confirm that the new consumer unit functions correctly with the existing wiring. This step is critical to prevent potential electrical hazards.
Frequently Asked Questions
What Is the Typical Lifespan of a Consumer Unit?
A consumer unit’s typical lifespan is approximately 25-30 years. Indicators for replacement include frequent circuit trips and visible wear. Regular maintenance and inspections are essential to guarantee safety and prolong unit longevity.
Can a DIY Enthusiast Legally Install a Consumer Unit?
Enthusiasts must heed strict electrical safety and installation guidelines when manoeuvring the labyrinth of DIY regulations. In the UK, legally installing a consumer unit requires adherence to precise standards, emphasising technical proficiency and safety.
How Does Weather Affect an Outdoor Consumer Unit?
Weather impacts outdoor consumer units through moisture damage, requiring robust insulation. Temperature fluctuations can degrade components, emphasising the need for materials designed for thermal resilience to guarantee safety and operational integrity.
What Are Common Issues With Consumer Unit Upgrades?
Common issues with consumer unit upgrades often include faulty circuit breakers, incorrect wiring, and insufficient capacity, creating a bottleneck in electrical flow. Ensuring precise, safety-focused installations mitigates the risks associated with these technical challenges.
Can Smart Technology Integrate With a Consumer Unit?
Smart technology can integrate with a consumer unit through Iot-enabled devices, enhancing smart home integration. This compatibility considerably impacts energy management and safety, requiring a precise understanding and implementation of technical specifications.